User Management
⚡ 5 min readManage users and roles with comprehensive CRUD operations. Add, edit, delete users, assign roles, and organize your authentication system.
What the User Management Panel Does
The User Management panel provides a modal dashboard with two tabs:
- Users Tab - Complete user management with add, delete, role assignment, sorting, and pagination
- Roles Tab - Role management with create, edit, and delete operations
The User Management panel opens as a floating modal window in the center of the screen, similar to User Analytics.
Prerequisites
- Active Transcodes project
Opening the User Management Panel
Log in to Transcodes Console
Go to Transcodes Console and sign in with your account.
Open your project
From the dashboard, select the project you want to manage. You’ll see the project overview page.
Find the Authentication Kit Cluster
On the project page, look for the Authentication Kit Cluster section. This is typically located in the main content area of the dashboard.
The cluster contains several cards/tiles including:
- Installation Guide
- Configuration
- Branding
- User Analytics
- User Management
- Backup
- JWK Generation
Click the User Management node
In the Authentication Kit Cluster, locate the card with the label “User Management”. Click on this card to open the User Management modal.
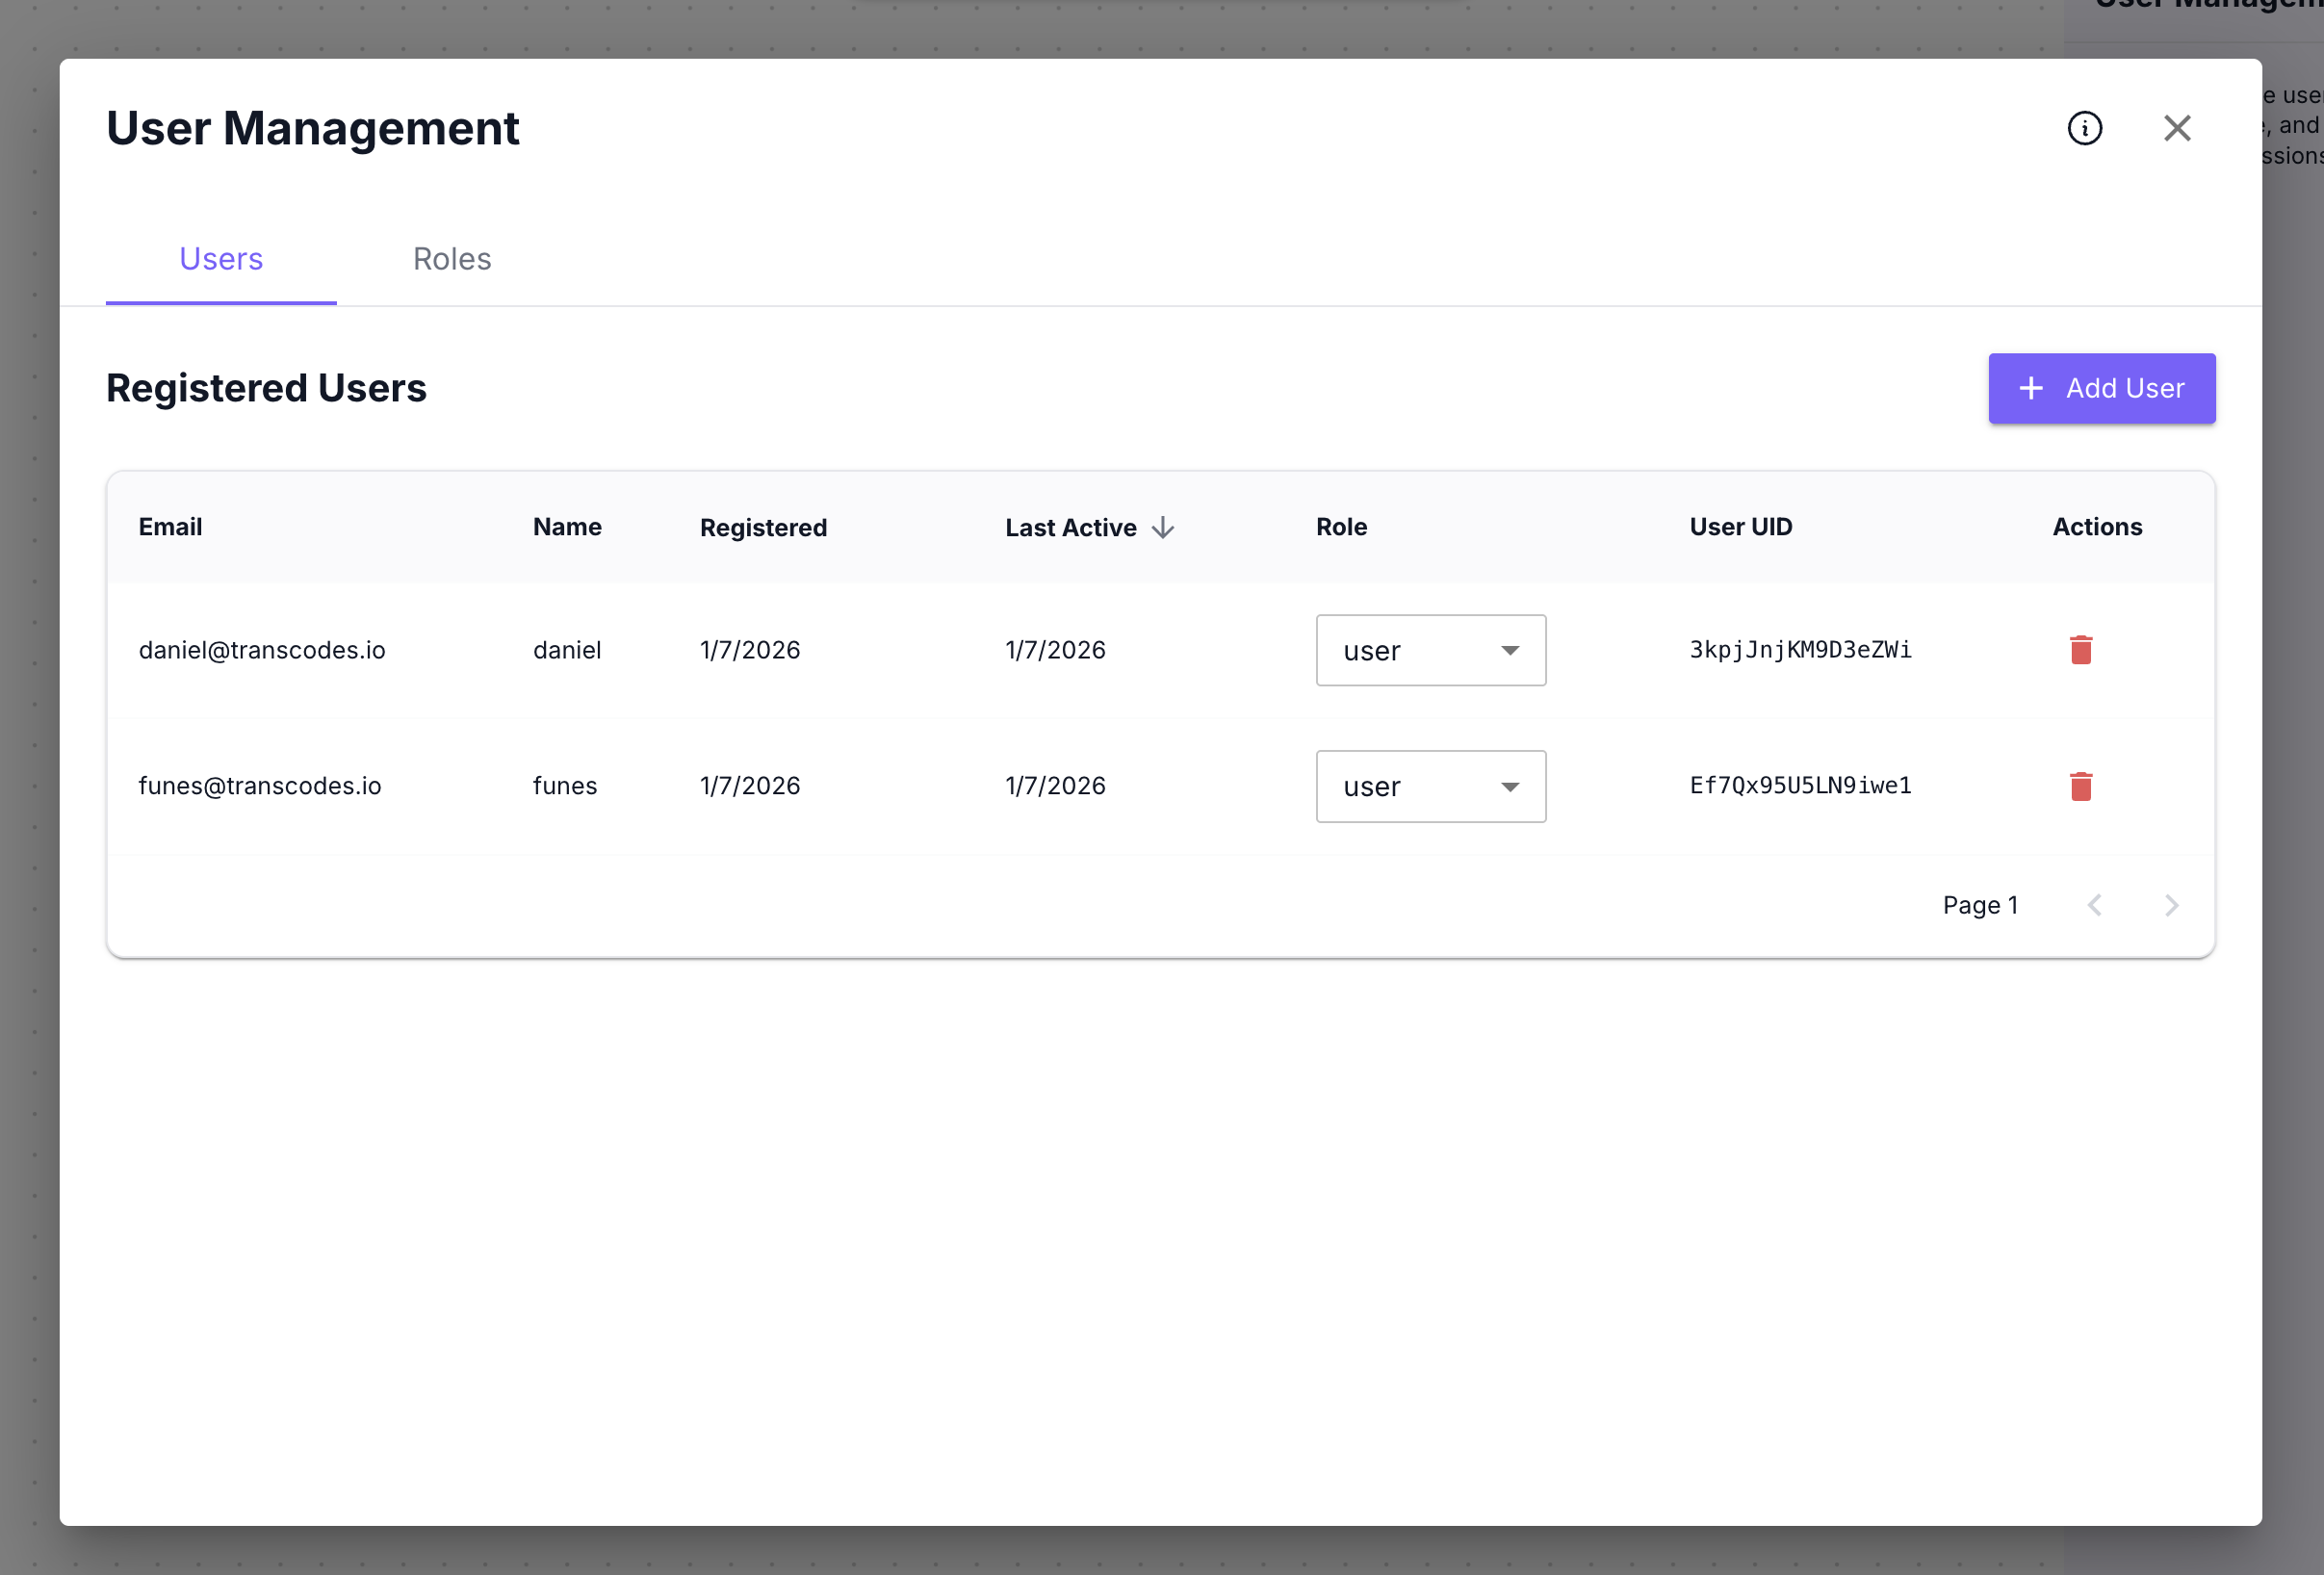
The User Management modal opens in the center with two tabs: Users and Roles.
Users Tab
The Users tab displays a comprehensive table of registered users with full management capabilities.
The Users tab shows:
- Registered Users section header
- + Add User button (top-right)
- User table with columns:
- Name
- Registered (sortable with ↓)
- Last Active (sortable with ↓)
- Role (dropdown selector)
- User UID (monospace font, truncated)
- Actions (delete button)
- Pagination controls (Page 1+, < >)
View Users
The user table displays up to 50 users per page with pagination controls at the bottom.
Table columns:
| Column | Description |
|---|---|
| User’s email address | |
| Name | Display name (may be auto-generated) |
| Registered | Account creation date (sortable) |
| Last Active | Last activity timestamp (sortable, default sort) |
| Role | Current role assignment (editable dropdown) |
| User UID | Unique user identifier (monospace, truncated) |
| Actions | Delete button |
Sort Users
To sort the user table:
- Click any column header with a sort indicator (↓)
- Available sort fields:
- Registered (createdAt) - Sort by registration date
- Last Active (updatedAt) - Sort by last activity (default)
- Click again to reverse the sort order (asc ↔ desc)
- Table automatically resets to page 1 when sorting changes
Add User
To add a new user:
- Click the + Add User button (top-right)
- The Add New User modal appears

- Fill in the form fields:
| Field | Required | Description |
|---|---|---|
| Yes | User’s email address (must be valid email format) | |
| Name | No | Display name (auto-generated if empty) |
| Role | No | User role from available roles dropdown (defaults to empty) |
| Metadata (JSON) | No | Custom metadata in valid JSON format |
- Click CREATE USER
- The user appears in the table immediately
Metadata Validation: The Metadata field must be valid JSON. Invalid JSON will prevent form submission.
Example metadata:
{
  "department": "engineering",
  "plan": "premium",
  "team": "backend"
}
Role assignment:
- Select a role from the dropdown (only shows existing roles)
- Leave empty to create user without role assignment
- Role can be assigned or changed later from the table
Update User Role
To change a user’s role:
- Find the user in the table
- Locate the Role column for that user
- Click the role dropdown
- Select a new role from the list:
- user (default role)
- Any custom roles you’ve created
- The role updates automatically
Role changes take effect immediately. The user’s permissions will reflect the new role assignment.
Delete User
To delete a user:
- Find the user in the table
- Click the delete button in the Actions column
- The Delete User confirmation modal appears
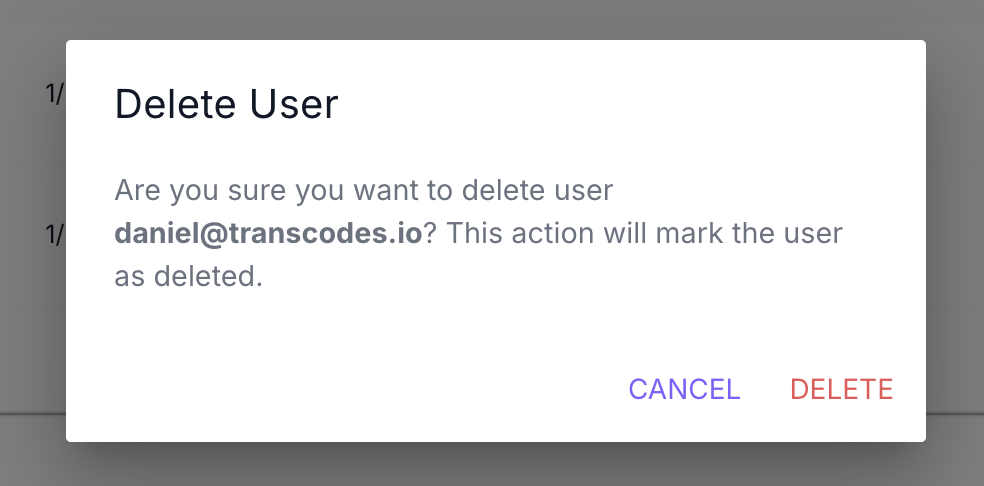
- Review the confirmation message showing the user’s email
- Click DELETE to confirm (or CANCEL to abort)
- The user is permanently deleted immediately
Warning: This action will permanently delete the user. The user’s authentication credentials will be completely removed and they will no longer be able to sign in. This action cannot be undone.
Roles Tab
The Roles tab allows you to create, edit, and delete custom roles for your application.
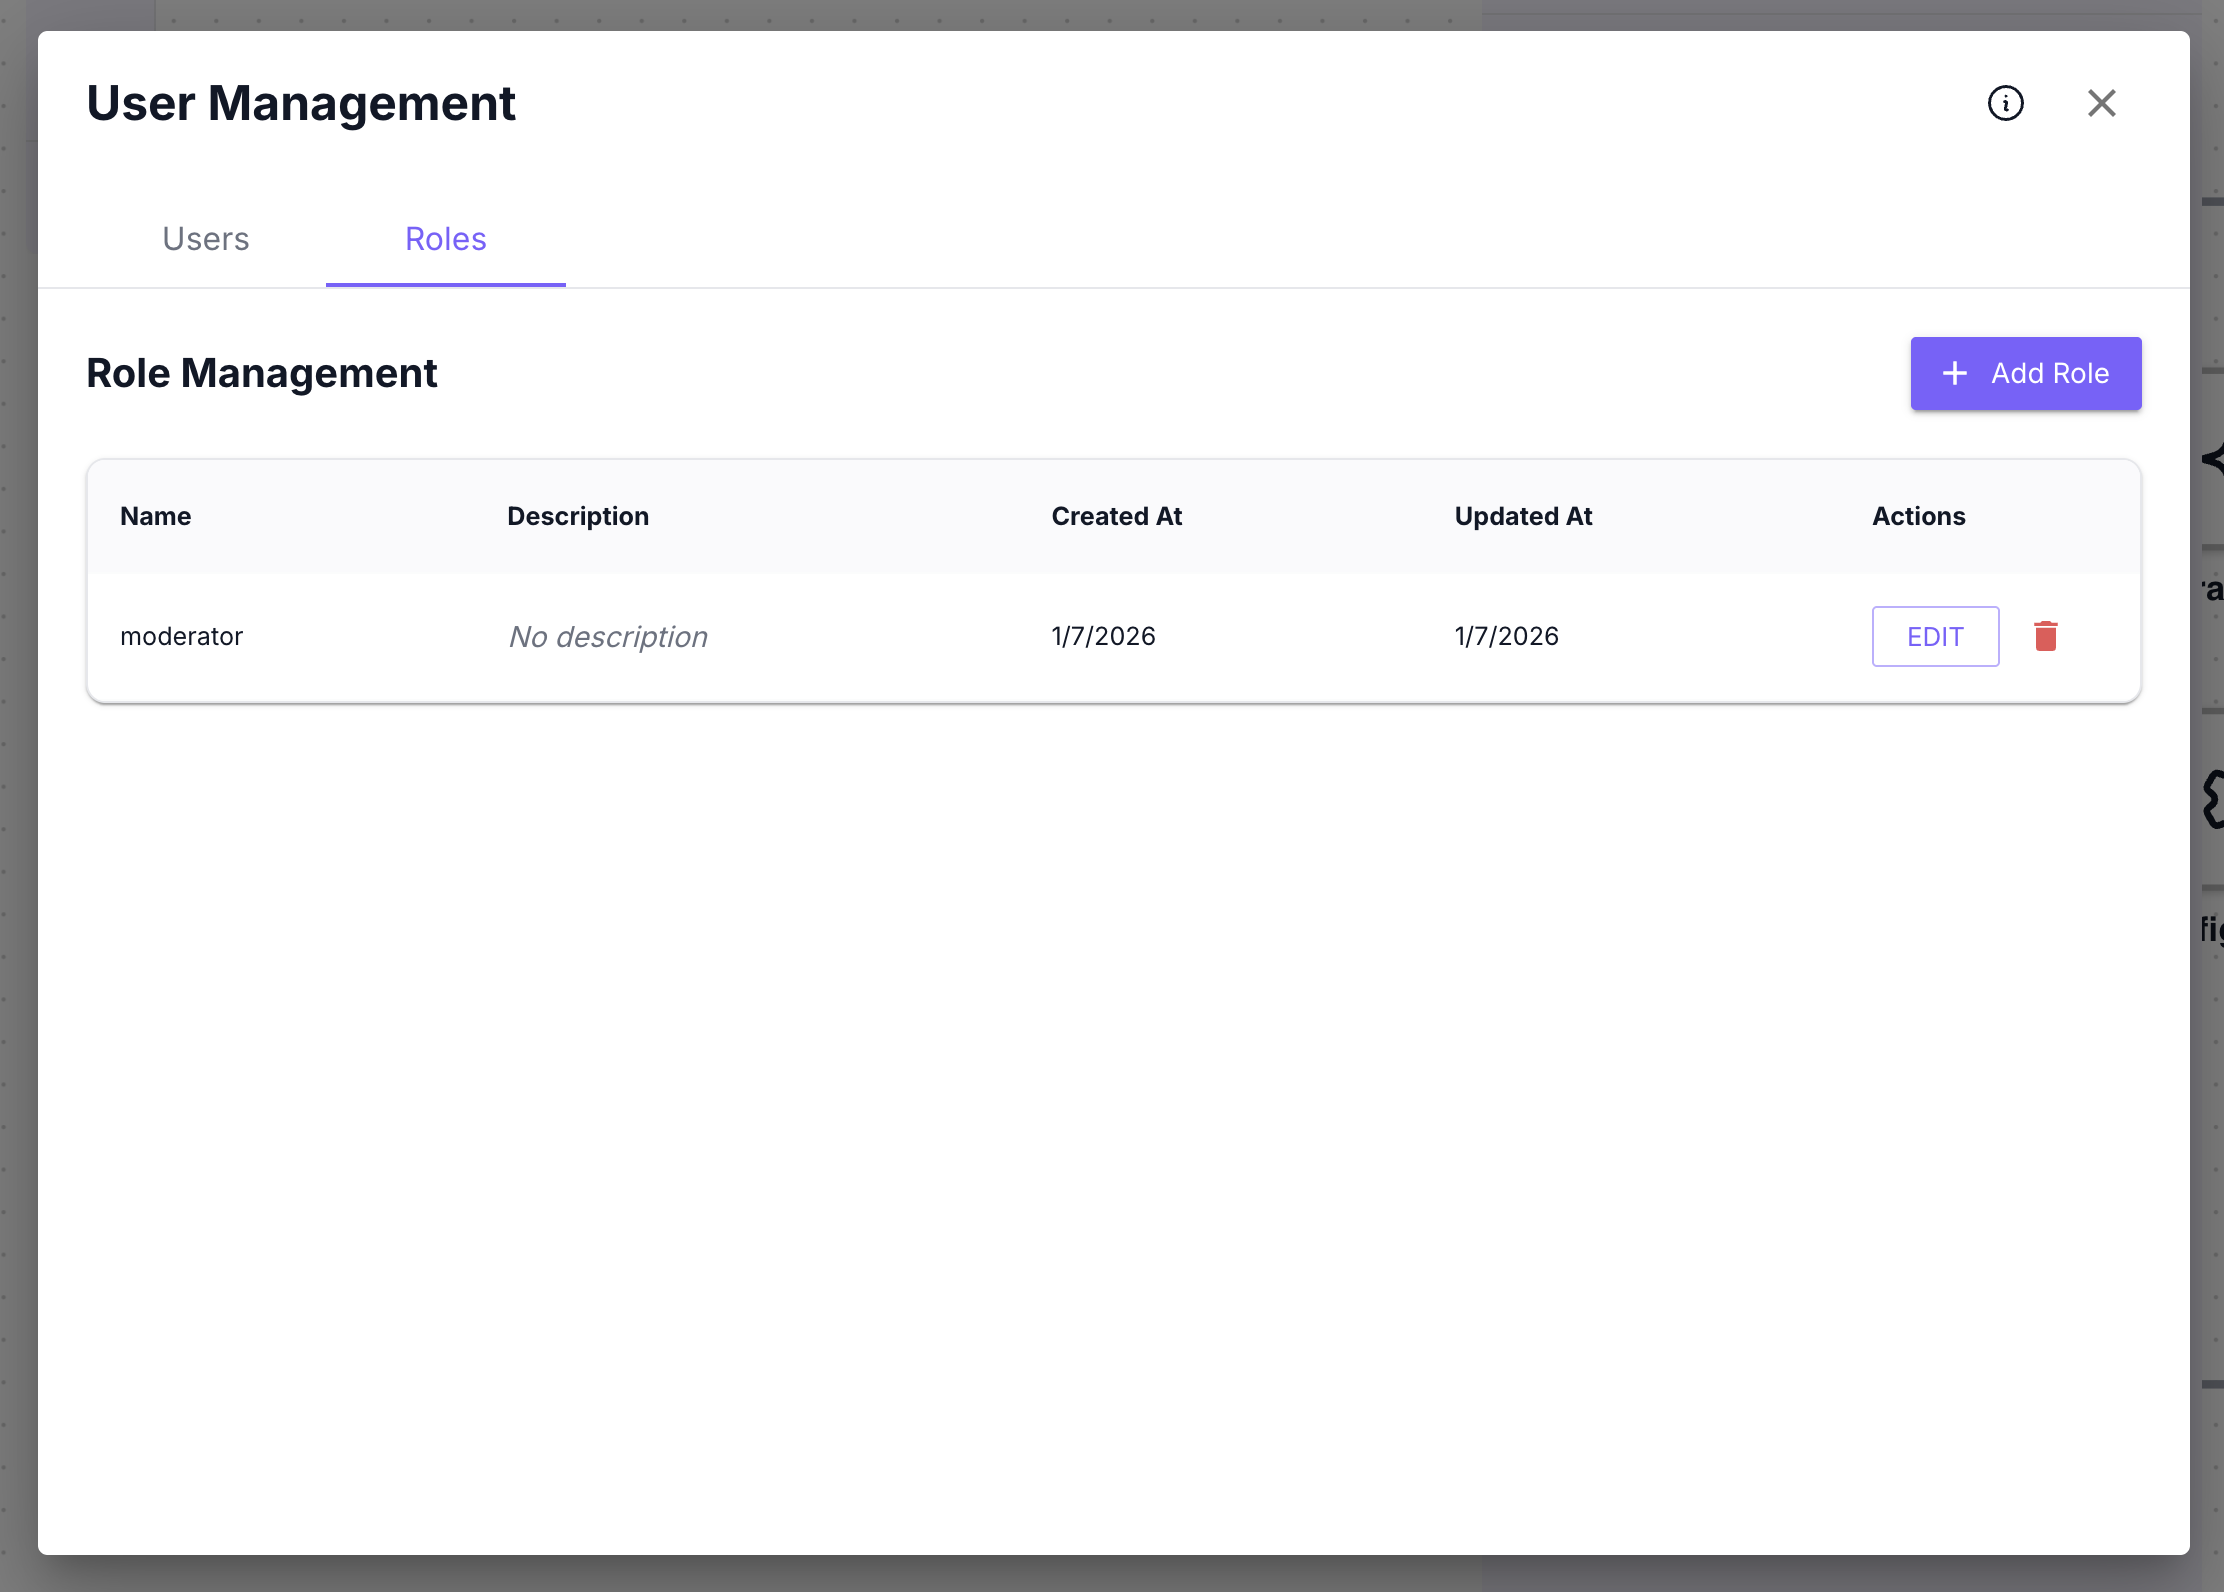
The Roles tab shows:
- Role Management section header
- + Add Role button (top-right)
- Role table with columns:
- Name
- Description
- Created At
- Updated At
- Actions (Edit button, Delete button)
View Roles
The role table displays all custom roles created for your project.
Table columns:
| Column | Description |
|---|---|
| Name | Role identifier (unique, cannot be changed after creation) |
| Description | Role description (optional, editable) |
| Created At | Role creation date |
| Updated At | Last modification date |
| Actions | Edit button and Delete button |
Add Role
To create a new role:
- Click the + Add Role button (top-right)
- The Add New Role modal appears
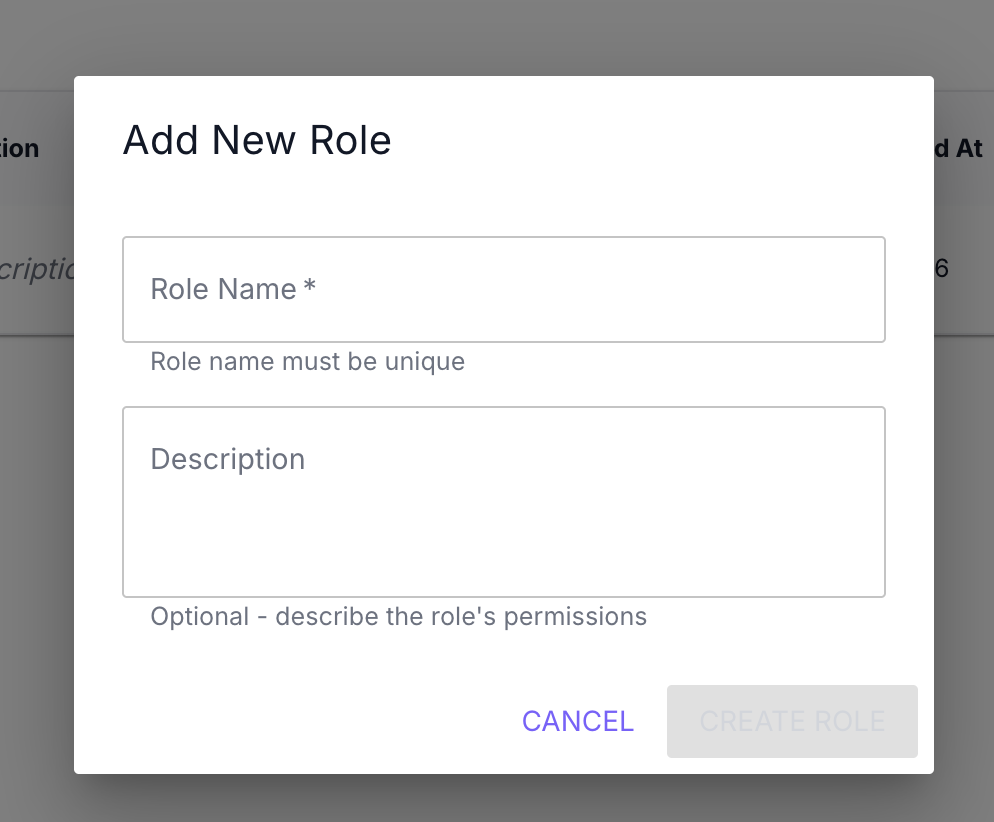
- Fill in the form fields:
| Field | Required | Description |
|---|---|---|
| Role Name | Yes | Unique role identifier (e.g., “admin”, “moderator”, “editor”) |
| Description | No | Optional description of the role’s permissions and purpose |
- Click CREATE ROLE
- The role appears in the table immediately
Role naming guidelines:
- Use lowercase letters, numbers, and underscores
- Examples:
admin,moderator,editor,viewer,guest - Role name must be unique within your project
- Role name cannot be changed after creation
Example role descriptions:
Full access to all features and settingsCan moderate content and manage usersRead-only access to contentEdit Role
To edit a role’s description:
-
Find the role in the table
-
Click the Edit button in the Actions column
-
The Edit Role modal appears
-
Update the Description field (Role Name is disabled and cannot be changed)
-
Click UPDATE ROLE
-
Changes are saved immediately
Note: Only the role description can be edited. Role names are permanent and cannot be changed after creation.
Delete Role
To delete a role:
-
Find the role in the table
-
Click the delete button in the Actions column
-
The Delete Role confirmation modal appears
-
Review the confirmation message
-
Click DELETE to confirm (or CANCEL to abort)
-
The role is removed immediately
Important: Roles that are already assigned to users cannot be deleted. You must first remove the role assignment from all users before deleting the role.
Before deletion:
- Check the Users tab to see which users have the role assigned
- Remove the role assignment from all users using the role dropdown in the Users tab
- Once no users have the role assigned, you can delete the role
What to do next?
After managing users and roles:
- Track user activity with analytics charts
- Download user data backups for data retention
- Configure authentication settings based on your user base
- Review API Reference for programmatic user management